
Introduction
Android app development has long been synonymous with Java and Kotlin as primary languages for building robust and versatile applications. However, for developers familiar with Swift, known for its expressiveness and safety, the desire to leverage its strengths in the Android ecosystem can be compelling. Until recently, the challenge of executing Swift code directly on Android has limited its adoption. Fortunately, the SCADE toolchain now provides a powerful solution, enabling Swift support on Android.
With the SCADE toolchain, developers can execute Swift code on Android, opening up new opportunities for cross-platform development. This means that existing Swift codebases can be utilized in Android projects, allowing for code sharing between iOS and Android applications. The benefits are vast, streamlining the development process and reducing maintenance overhead.
In this article, we will explore how to integrate Swift code into an Android Studio project using the SCADE toolchain. We will guide you through each step of the process, from setting up the development environment to declaring and calling native Java methods from Swift and vice versa. Additionally, we will demonstrate how the swift-java package, part of the SCADE toolchain, simplifies the interaction between these languages and streamlines the development workflow.
Whether you are a seasoned developer or new to cross-platform development, this article will equip you with the knowledge and tools to unlock the full potential of Swift on the Android platform. Let’s embark on this journey of seamless integration and explore the vast potential that Swift offers on the Android platform.
Creating a New Project in Android Studio
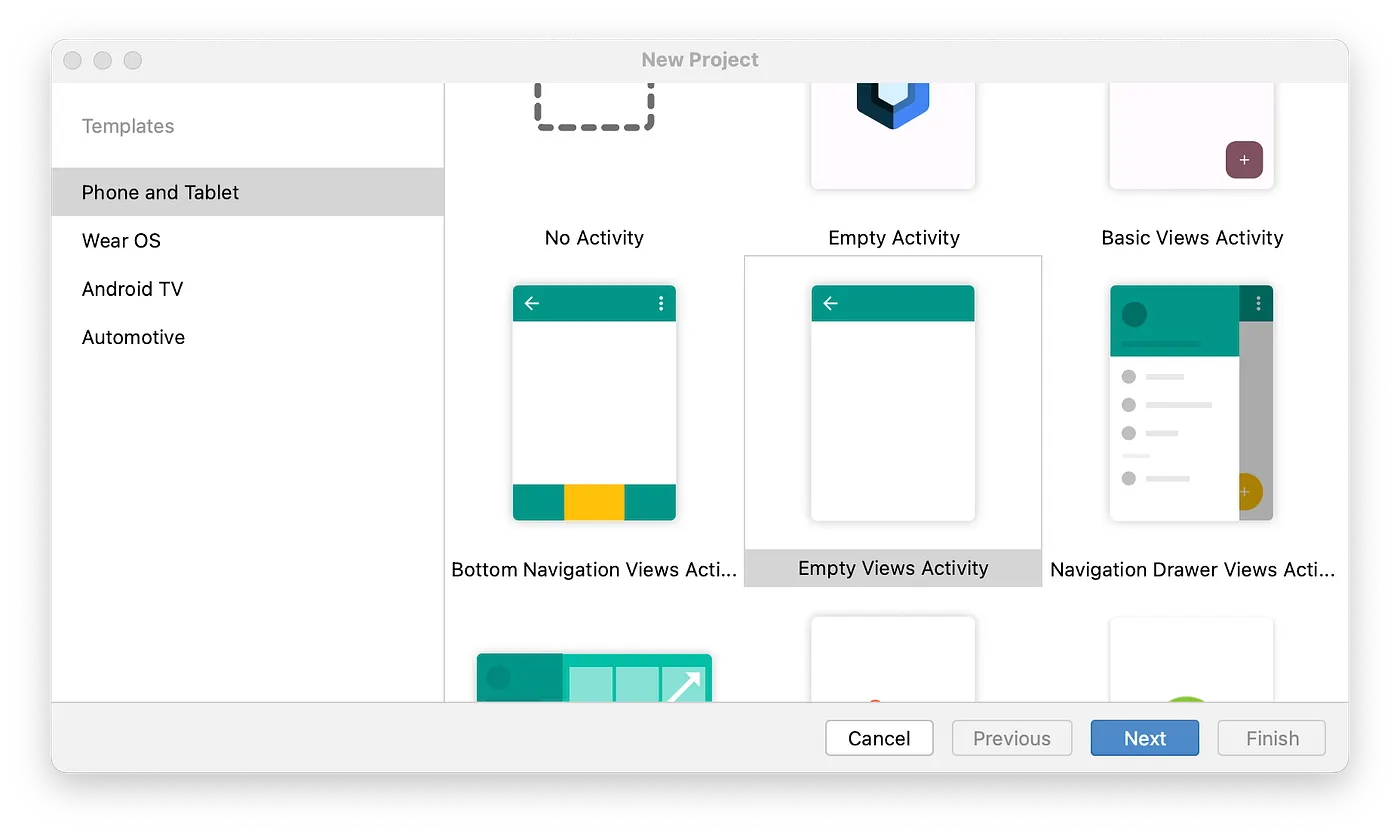
Let’s begin by creating a new project in Android Studio. Launch Android Studio and create a new project. Android Studio will display the project template selection page. You can choose a suitable template that best fits your application requirements. For this guide, we will use the Empty Views Activity template as the foundation for our project. After selecting the project template, click the Next button.
On the second page, configure the project details, such as the project name, package name, and project location. For this example, we will use SwiftAndroidExample as the project name and com.example.myapplication as the package name. You have the option to use either Java or Kotlin as the primary language for your project. In this guide, we will use Java.
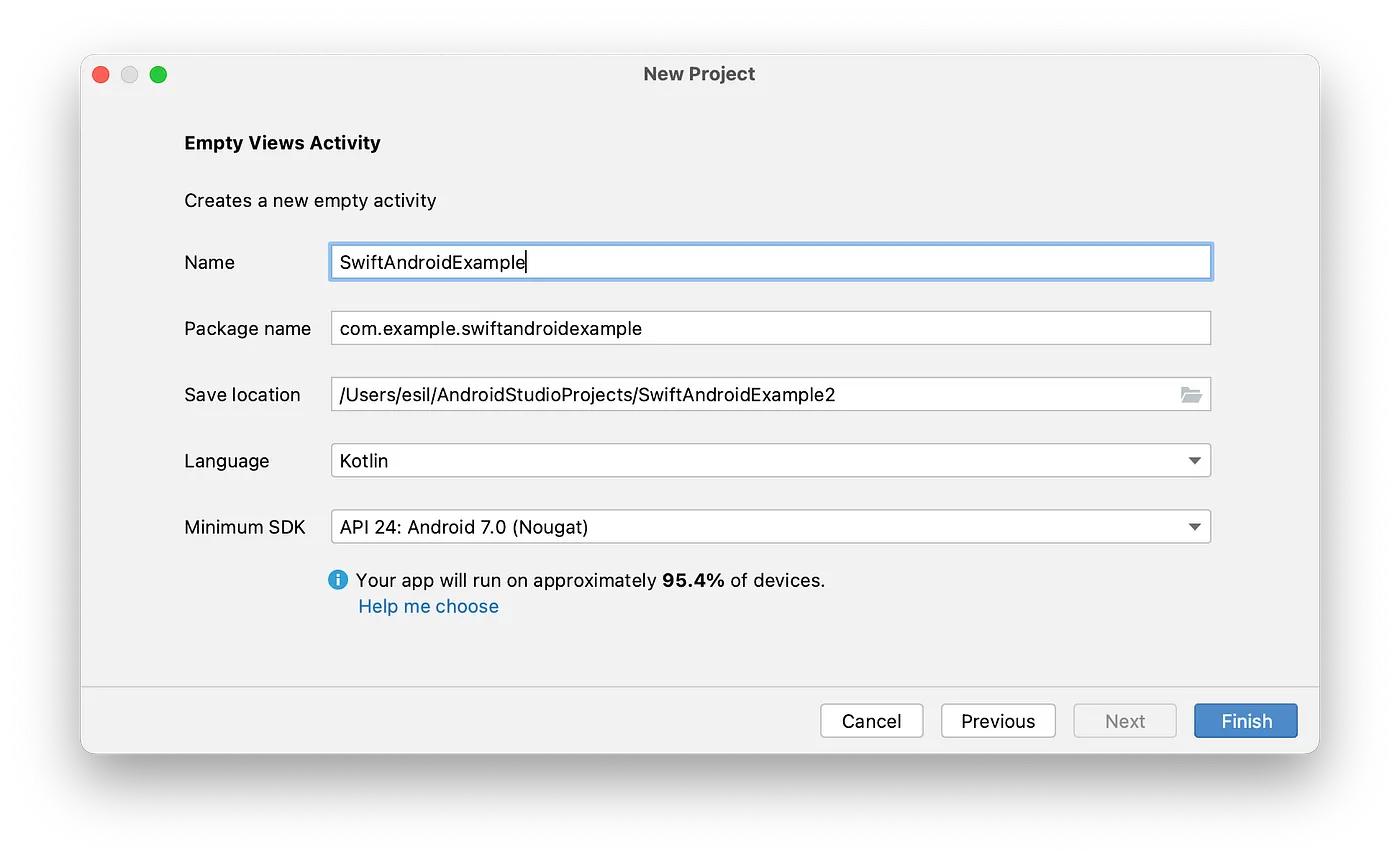
After configuring the project details, click “Finish” to create the new Android Studio project.
Adding swift code into the Android Studio project
Now, let’s proceed to add Swift code to our Android Studio project. First, we need to create a subdirectory within the Android Studio project, where all the Swift code will reside. In this article, we will utilize the app/src/main/swift subdirectory for this purpose.
To initialize a new Swift Package Manager (SPM) project within the app/src/main/swift subdirectory, execute the following commands in the terminal:
cd SwiftAndroidExample/app/src/main/swift
swift package init --name SwiftAndroidExample
The swift package init command will set up a new SPM project named SwiftAndroidExample inside the swift subdirectory, allowing you to manage Swift dependencies and build your Swift code as a separate module within your Android Studio project.
Note: If you already have an existing SPM project, you can either copy it directly into the app/src/main/swift subdirectory or add it as a git submodule. The latter method allows you to maintain a separate repository for your Swift code and link it as a submodule within your Android Studio project.
In the newly created SPM project, we need to change the product type to a dynamic library. To achieve this, add the type: .dynamic parameter in the library description within the Package.swift file. The resulting product description should look like the following:
products: [
    .library(
        name: "SwiftAndroidExample",
        type: .dynamic,
        targets: ["SwiftAndroidExample"]),
],
Embedding SPM Project in Android Studio Build
Next, we need to configure Gradle to build and incorporate the Swift code into the resulting APK. To achieve this, we need to make several modifications in the app/build.gradle build file.
In the ‘android’ section, add the following subsection:
sourceSets {
    main {
        jniLibs.srcDirs = ["lib"]
    }
}
This modification tells Gradle to search for JNI libraries in the lib subdirectory and include them in the APK during the build process. These JNI libraries are a result of building the SPM package and additional swift runtime libraries required to execute swift code.
In the dependencies section of the app/build.gradle file, add the following line:
implementation fileTree(dir: 'lib', include: ['*.jar'])This line instructs Gradle to search for .jar libraries in the lib subdirectory and include them in the resulting APK. The result of building the SPM project will contain additional support .jar libraries required for the proper functioning of the Foundation library, and it is essential to include these libraries in the build to ensure correct execution of Swift code.
At the end of the app/build.gradle file, add the following code:
task buildSwiftProject(type: Exec) {
    commandLine '/Application/Scade.app/Contents/PlugIns/ScadeSDK.plugin/Contents/Resources/Libraries/ScadeSDK/bin/scd',
            'spm-archive', '--type', 'android',
            '--path', 'src/main/swift',
            '--platform', 'android-arm64-v8a',
            '--platform', 'android-x86_64',
            '--android-ndk', '/opt/android-ndk-r25'
}

tasks.whenTaskAdded { task ->
    if (task.name == 'assembleDebug' || task.name ==    'assembleRelease') {
        task.dependsOn buildSwiftProject
    }
}
This code adds a custom Gradle task, buildSwiftProject, that will execute the scd utility (SCADE command-line tool) to build the Swift project. The task uses the spm-archive subcommand with appropriate parameters to build the Swift code for Android on ARM64 (android-arm64-v8a) and x86_64 (android-x86_64) architectures, using the specified Android NDK location (/opt/android-ndk-r25).
Replace /Application/Scade.app with the actual path to your Scade IDE application on your system. The specified path is where the scd utility is located within the Scade IDE application.
Additionally, this code sets up a dependency relationship between the new buildSwiftProject task and the standard Android tasks assembleDebug and assembleRelease, ensuring that the Swift code is built before generating the APK for both debug and release builds.
Now, your Android Studio project is fully prepared to execute Swift code on Android. Upon building the project, all the necessary libraries, including those resulting from building the SPM project and Swift runtime libraries, will be automatically embedded into the resulting APK. This ensures the correct execution of Swift code on Android.
In the next sections, we will describe how to call Swift code from Java using standard Java Native Interface (JNI) or SCADE’s additional support libraries.
Preparing Android Manifest
Before we proceed with executing Swift code from within our Android Studio project, we need to ensure that the necessary permissions are added to the AndroidManifest.xmlfile. These permissions enable Swift’s network functions to work correctly. Add the following lines to your AndroidManifest.xml file:
<manifest xmlns:android="http://schemas.android.com/apk/res/android"
    package="com.example.myapplication">

    <!-- Other manifest entries -->

    <!-- Add INTERNET permission to allow network access -->
    <uses-permission android:name="android.permission.INTERNET" />

    <!-- Add ACCESS_NETWORK_STATE permission to check network connectivity -->
    <uses-permission android:name="android.permission.ACCESS_NETWORK_STATE" />

    <!-- Other manifest entries -->

</manifest>
Initializing Swift Runtime and loading JNI library
The initialization of the Swift runtime is required for the correct execution of Swift code. This initialization process is achieved by calling the Initialize static method provided by the org.swift.swiftfoundation.SwiftFoundation class, which is part of the SCADE toolchain.
In our example, we will add this initialization code in the onCreate method of the main activity. However, it can also be added in the onCreate method of the application class if desired. The Initialize method takes two parameters: a pointer to the Android context and a boolean value, which should always be set to false. The code snippet below demonstrates how to perform this initialization:
@Override
protected void onCreate(Bundle savedInstanceState) {
    super.onCreate(savedInstanceState);
    setContentView(R.layout.activity_main);

    try {
        org.swift.swiftfoundation.SwiftFoundation.Initialize(this, false);
    } catch (Exception err) {
        android.util.Log.e("Swift", "Can't initialize Swift Foundation: " + err.toString());
    }

    // Rest of your activity code
}
After initializing the Swift runtime, the next step is to load the JNI library that contains your Swift code, which was built using the scd utility from the SCADE toolchain. To load the JNI library, use the System.loadLibrary() method and pass the name of the library as a parameter. In our example, we named the JNI library SwiftAndroidExample, so the code to load the library looks like this:
System.loadLibrary("SwiftAndroidExample");With the Swift runtime now initialized and the JNI library successfully loaded, we are now fully prepared to execute Swift code on Android. In the next section, we will proceed with declaring and calling native Java methods, and then implementing them in Swift.
Calling Swift Code from Java
To call Swift code from Java in our project, we will begin by declaring a native Java method called loadData in the MainActivity class:
public class MainActivity extends AppCompatActivity {
    // Other activity code

    private native void loadData(String url);

    // Rest of the activity code
}
The loadData method takes a String parameter containing a URL and will be responsible for loading data from that URL. We will implement this method in Swift in the subsequent steps.
To execute our Swift code, we will call the loadData method from the onCreate method of the MainActivity class. Be sure to insert the call at the end of the onCreate method, after initializing the Swift runtime and loading the JNI library:
@Override
protected void onCreate(Bundle savedInstanceState) {
    // Swift inializtaion and JNI library loading code

    loadData("https://example.com/data");
}
Now, we will add the implementation of the loadData method in the SwiftAndroidExample.swift file, which was previously created with the swift package init command. This file is part of the Swift Package Manager project that we added to our Android Studio project earlier. The implementation of the loadData method should be declared as follows:
import Foundation
import Dispatch

// import of CJNI module is rquired to use JNI types in swift code
import CJNI

@_silgen_name("Java_com_example_swiftandroidexample_MainActivity_loadData")
public func MainActivity_loadData(env: UnsafeMutablePointer<JNIEnv>, activity: JavaObject, javaUrl: JavaString) {
    // Implementation of the loadData method
}
This loadData function is annotated with the @_silgen_name attribute to ensure that the Swift function is correctly mapped to the JNI function name used on the Java side. It takes three parameters:
env: A pointer to the JNI environment. This allows Swift to interact with the Java environment.activity: A reference to the JavaMainActivityclass. This provides access to the current Android activity context.javaUrl: A Java String object containing the URL from which data will be loaded. Swift can interact with Java string objects through theJavaStringtype.
Preparing JNI Environment in Swift
Before we proceed to implement data loading in Swift, we need to make some small preparations in our Swift code. These preparations will allow us to interact with Java objects and call JNI functions in a more straightforward and convenient way.
In the SwiftAndroidExample.swift source file, first, we declare a global variable to store the JNI environment pointer:
// SwiftAndroidExample.swift

// Global variable to store the JNI environment pointer
private var jniEnv: UnsafeMutablePointer<JNIEnv>? = nil
Next, we declare a computed variable that provides access to the JNI Native Interface using the stored jniEnv pointer:
// SwiftAndroidExample.swift

// Computed variable to provide access to the JNI Native Interface
private var jni: JNINativeInterface {
    return jniEnv!.pointee.pointee
}
Finally, in the implementation of the MainActivity_loadData JNI function, we save the value passed in the env parameter to the jniEnv global variable:
// SwiftAndroidExample.swift

// Implementation of the MainActivity_loadData JNI function
@_silgen_name("Java_com_example_swiftandroidexample_MainActivity_loadData")
public func MainActivity_loadData(env: UnsafeMutablePointer<JNIEnv>, activity: JavaObject, javaUrl: JavaString) {
    // Save the JNI environment pointer to the global variable
    jniEnv = env

    // ...
}
Processing Parameters passed from Java to Swift
Now, let’s focus on the MainActivity_loadData function. In this function, we need to process the parameters passed from Java to Swift, prepare them for data loading, and initiate the asynchronous download process.
First, we create a new JNI global reference to the activity object using the jni.NewGlobalRef function. This ensures that the activity object is retained in memory during the execution of Swift code, preventing potential garbage collection issues.
// Create a new JNI global reference to the activity object
let mainActivity = jni.NewGlobalRef(env, activity)!
Second, we convert the Java string (javaUrl) to a Swift string. We use jni.GetStringUTFChars function to get a pointer to the UTF-8 representation of the Java string, and then use String(cString:) initializer to create a Swift string from that pointer. Afterward, we release the UTF-8 characters pointer using jni.ReleaseStringUTFChars function. This ensures that the data is correctly converted and prepared for use in the Swift code.
// Convert the Java string (javaUrl) to a Swift string
let chars = jni.GetStringUTFChars(jniEnv!, javaUrl, nil)
let str = String(cString: chars)
jni.ReleaseStringUTFChars(jniEnv!, javaUrl, chars)
Third, we start the data download asynchronously in the main thread using Swift’s async/await syntax. The Task starts a new asynchronous task, and we await the downloadData function, passing the mainActivity and str as parameters. The downloadData function is responsible for the actual data loading and will be implemented in the next section. This approach ensures that the data loading process runs asynchronously, preventing any potential blocking of the UI thread and providing a smooth user experience.
// Start the data download asynchronously in the main thread
Task {
    await downloadData(activity: mainActivity, url: str)
}
Implementing Data Loading in Swift
In this section, we will focus on writing the downloadData function in Swift. This function is responsible for downloading data from the specified URL and executing a callback in the main activity after the download is finished.
The final code for the downloadData function is as follows:
// Downloads data from the specified URL. Executes a callback in the main activity after the download is finished.
@MainActor
public func downloadData(activity: JavaObject, url: String) async {
    do {
        let (data, _) = try await URLSession.shared.data(from: URL(string: url)!)
        let dataStr = String(data: data, encoding: String.Encoding.utf8) ?? "<can't convert data to string>'"
        executeActivityCallback(activity: activity, str: dataStr)
    }
    catch {
        var userInfoStr = ""
        if let nsError = error as? NSError {
            userInfoStr = "\(nsError.userInfo)"
        }
        executeActivityCallback(activity: activity, str: "ERROR loading from URL '\(url)': \(error) \(userInfoStr)")
    }

    // Removing JNI global reference to the activity object
    jni.DeleteGlobalRef(jniEnv!, activity)
}
In this implementation, we use the Swift async/await syntax to perform the data download asynchronously. We utilize the URLSession.shared.data(from:) method to fetch the data from the specified URL. Once the download is completed, we convert the data to a string using String(data:encoding:) initializer.
If the download is successful, we execute the executeActivityCallback function, passing the activity object and the downloaded data string as parameters. This function is responsible for executing the callback in the main activity, allowing us to update the UI or perform other actions after the download is finished.
In case of an error during the data download, we catch the error and execute the executeActivityCallback function with an error message, providing details about the encountered error. This ensures that any errors during the download process are appropriately handled and reported to the main activity.
Finally, we remove the JNI global reference to the activity object using jni.DeleteGlobalRef to prevent any potential memory leaks and to release the reference to the activity object after its use in Swift code.
Implementing callback method invocation
Now, let’s implement the executeActivityCallback function, which will be responsible for calling the callback in the main activity. This callback will pass the downloaded data string from Swift to the Java side, enabling us to update the UI or perform any desired actions after the data loading is complete.
The final code for the executeActivityCallback function is as follows:
// Executes the callback in the main activity
private func executeActivityCallback(activity: JavaObject, str: String) {
    // Getting the class of the activity object
    let cls = jni.GetObjectClass(jniEnv!, activity)

    // Searching for the onDataLoaded method in the activity class
    let methodId = jni.GetMethodID(jniEnv!, cls, "onDataLoaded", "(Ljava/lang/String;)V")

    // Converting the Swift string to a Java string
    let jStr = jni.NewStringUTF(jniEnv!, str)

    // Building an array of arguments
    let args: [JavaParameter] = [JavaParameter(object: jStr)]

    // Executing the onDataLoaded method
    jni.CallVoidMethod(jniEnv!, activity, methodId, args)
}
In this implementation, we first get the class of the activity object using jni.GetObjectClass. We then search for the onDataLoaded method in the activity class using jni.GetMethodID. This function searches for a method with the given name and signature in the provided class.
Next, we convert the Swift string str to a Java string using jni.NewStringUTF function. This conversion allows us to pass the Swift string as an argument to the Java method.
We build an array of arguments args with the Java string as the only element. This array represents the arguments to be passed to the Java method.
Finally, we execute the onDataLoaded method in the main activity using jni.CallVoidMethod function, passing the activity object, method ID, and the array of arguments. This completes the callback process, allowing us to pass the downloaded data from Swift to the Java side and trigger the appropriate actions in the UI.
Implementing onDataLoaded Method in MainActivity
To handle the callback from Swift and display the loaded data, we need to implement the onDataLoaded method in the MainActivity.java source file. In our example, this method will simply log the loaded data to the Android log using the android.util.Log class.
public class MainActivity extends AppCompatActivity {
    // Other activity code

    public void onDataLoaded(String data) {
        android.util.Log.i("SwiftAndroidExample", "LOADED DATA: " + data);
    }

    // Rest of the activity code
}
The onDataLoaded method takes a String parameter data, which represents the loaded data from Swift. In this implementation, we log the received data using the android.util.Log.i method, which displays an informational message in the logcat. You can customize this method to handle the loaded data according to your application’s needs.
Simplifying Java-Swift Interaction with the swift-java Library
The swift-java library provided by SCADE offers a convenient and simplified approach to interact between Java and Swift code in your Android Studio project. In this section, we will give a brief example of how to utilize the swift-java library to further enhance the seamless interplay between Java and Swift. The example will demonstrate how you can call Swift functions from Java and vice versa, with reduced boilerplate code, thanks to the additional support libraries provided by swift-java.
First, we need to add the swift-java package to the list of dependencies in the SPM manifest. To achieve this, add the following code to the dependencies section of the manifest:
dependencies: [
    .package(url: "https://github.com/scade-platform/swift-java.git", branch: "main")
],
This code instructs Swift Package Manager to fetch the swift-java package from the specified URL and branch.
Next, we have to include the Java library from the swift-java package in the list of dependencies for the AndroidLibraryExample target. To do this, modify the target section as follows:
.target(
    name: "AndroidLibraryExample",
    dependencies: [
        .product(name: "Java", package: "swift-java")
    ]),
With these changes made to the SPM manifest, the swift-java package is now integrated into our Swift Package Manager project. This will allow us to call Swift functions from Java and Java functions from Swift in our Android Studio project using swift-java’s powerful capabilities.
Here is an updated code in the SwiftAndroidExample.swift file which contains updated versions of the downloadData and MainActivity_loadData functions:
import Foundation
import Dispatch
import Java

// Downloads data from specified URL. Executes callback in main activity after download is finised.
@MainActor
public func downloadData(activity: JObject, url: String) async {
    do {
        let (data, _) = try await URLSession.shared.data(from: URL(string: url)!)
        let dataStr = String(data: data, encoding: String.Encoding.utf8) ?? "<can't convert data to string>'"
        activity.call(method: "onDataLoaded", dataStr)
    }
    catch {
        var userInfoStr = ""
        if let nsError = error as? NSError {
            userInfoStr = "\(nsError.userInfo)"
        }
        activity.call(method: "onDataLoaded", "ERROR loading from URL '\(url)': \(error) \(userInfoStr)")
    }
}

// NOTE: Use @_silgen_name attribute to set native name for a function called from Java
@_silgen_name("Java_com_example_swiftandroidexample_MainActivity_loadData")
public func MainActivity_loadData(env: UnsafeMutablePointer<JNIEnv>, activity: JavaObject, javaUrl: JavaString) {
    // Create JObject wrapper for activity object
    let mainActivity = JObject(activity)

    // Convert the Java string to a Swift string
    let str = String.fromJavaObject(javaUrl)

    // Start the data download asynchronously in the main actor
    Task {
        await downloadData(activity: mainActivity, url: str)
    }
}
Let’s briefly describe the modifications:
- We import the
Javamodule instead of theCJNI. Theimport Javastatement allows us to access the Java-related classes and functionalities provided by the swift-java package. This replaces the previousimport CJNIstatement. - We no longer need to store the Java environment explicitly. The
swift-javapackage automatically manages the Java environment for us, ensuring that JNI operations are performed correctly without the need for us to store the environment in a global variable. - We use the
JObjectclass instead of theJavaObject. TheJObjectclass is part of theswift-javapackage and provides a more convenient and safer way to interact with Java objects from Swift code. It simplifies the process of working with Java objects and avoids potential memory management issues by automatically handling JNI references. - We now call the
onDataLoadedJava method using thecallmethod of theJObjectclass. Thecallmethod allows us to directly invoke Java methods from Swift code in a more natural and expressive way. We pass the name of the Java method to be called (in this case,"onDataLoaded") as well as any arguments required by the Java method. - We convert the Java string to a Swift string using a single call to the
fromJavaObjectstatic method of theStringclass. TheString.fromJavaObject(javaUrl)statement automatically performs the conversion, making it more concise and readable. - We no longer need to explicitly convert the Swift string to a Java string when calling the
onDataLoadedJava method. In the previous version, we used thejni.NewStringUTFcall to convert the Swift string to a Java string. However, with the updated code, this step is no longer necessary as thecallmethod of theJObjectclass automatically handles the conversion of Swift types to Java types when passing arguments to Java methods.
Conclusion
In this article, we have explored how to use the SCADE toolchain to seamlessly integrate Swift into Android projects. With SCADE, developers can use the full potential of Swift on the Android platform, allowing for the easy incorporation of Swift code into Android Studio projects. This also opens up the possibility of reusing existing Swift code bases on Android, streamlining development, and maximizing code reuse.
Additionally, we have seen how the swift-java package provided by SCADE simplifies the interaction between Java and Swift code. By using the swift-java package, developers can effortlessly invoke Java methods from Swift, reducing the complexities of interop and ensuring smooth communication between the two languages. This powerful combination empowers developers to unlock the true potential of Swift on the Android platform, enabling the creation of high-performance and feature-rich Android applications with ease.
Example Source Code
Discover the complete source code for the example described in this article by visiting our GitHub repository:
https://github.com/scade-platform/swift-android-examples
What’s Next?
As we continue to enhance the SCADE toolchain, we are actively working on improvements to provide even better support for Swift on the Android platform. Our focus is on streamlining your development experience and unlocking the full potential of cross-platform Swift projects. Here’s a glimpse into our upcoming plans:
Better Integration of Building SPM for Android in SCADE IDE: We are working to provide a seamless integration within the SCADE IDE, allowing you to build Swift SPM projects specifically for Android. This includes generating .aar archives for easier integration into Android Studio projects.
Improved Java and Swift Interoperability: We are dedicated to enhancing the interaction between Swift and Java, including the auto-generation of boilerplate interop code. This will make it even more convenient to integrate Swift code into Android projects.
Get ready for a stream of exciting updates and improvements! As we continue to empower you in creating innovative and efficient cross-platform applications with Swift on Android using the SCADE toolchain, we’re thrilled to share that more enhancements are on the horizon.
Your valuable feedback and insights are the driving force behind our progress, and we’re eagerly looking forward to delivering these improvements that will take your development process to the next level. Stay tuned for a more enhanced Swift development experience! 🤞
Leave a Reply